If you love snake plants (Sansevieria, also called mother-in-law’s tongue), you’ll be happy to know that you can easily grow more without spending a dime! Instead of buying new plants, you can propagate the ones you already have using simple techniques.
It’s a fun and rewarding way to expand your indoor jungle—or even share new plants with friends!
Table of Contents
4 Easy Methods For Snake Plant Propagation
So, how do you propagate snake plants? There are four easy methods:
 Water Propagation – Cut a healthy leaf and place it in water until roots form.
 Soil Propagation – Plant a leaf cutting directly into soil to root.
 Division – Simply split a mature plant into sections.
 Rhizome Propagation – Use the underground stems to grow a new plant.
Once you have successful propagated a new plant be sure to follow our detailed instructions on snake plant care to ensure your plant grows healthy and quickly and lives for many years.
Excited to try it yourself?
Let’s dive into the details and figure out which propagation method is right for you!
How to Propagate Snake Plants in Water
One of the easiest ways to propagate a snake plant is by rooting cuttings in water.
This method is perfect for rescuing bent or broken leaves, or for using up extra leaves you’ve pruned while shaping your plant.
Plus, it’s a fun and simple way to grow new plants!
What You’ll Need:
 Sharp knife or scissors
Heavy glass, jar, or vase
Water
Rooting hormone (optional)
Step-by-Step Guide:
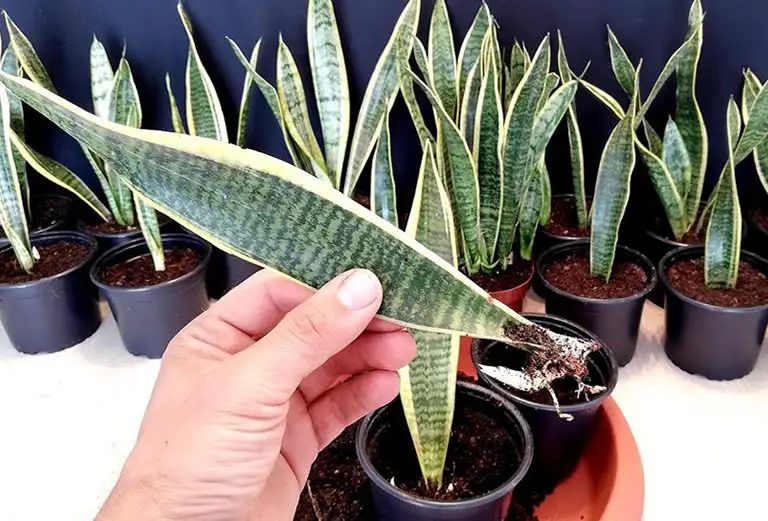
Take a Clean Cut – Using a sharp, sterilized knife or scissors, cut a healthy leaf as close to the soil as possible. A clean cut helps the plant root more effectively. If you want, dip the cut end in rooting hormone to encourage faster growth.
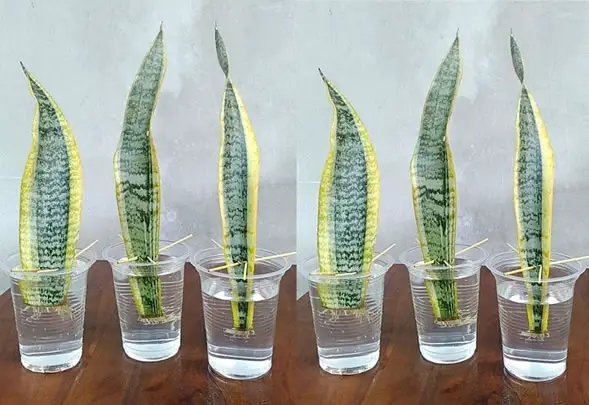
Place in Water – Fill a jar or vase with water and submerge about 25% of the leaf. If the leaf is large, you can cut it into sections and root multiple pieces. Just be sure to keep the original bottom end facing down, as snake plant leaves are highly polar—they won’t root if placed upside down!
Cut a V Shape – A little trick to boost success: cut a small V shape at the bottom of the leaf. This increases the surface area for rooting, keeps the leaf from pressing against the bottom of the jar, and helps you remember which end goes in the water.
Provide Good Conditions – Place your jar in a warm, well-lit area with plenty of indirect light. Use a heavy vase or jar (like a mason jar or tall flower vase) to prevent top-heavy leaves from tipping over.
 Change the Water Regularly – Swap out the water once a week or anytime it looks cloudy. Clean water prevents bacteria buildup and keeps your cutting healthy.
 Be Patient – Water propagation takes time—sometimes two months or longer for roots to appear. Eventually, you may also notice tiny shoots developing along with the roots.
 Transfer to Soil – Once the roots are well developed, plant your cutting in fresh, well-draining soil. Bury it as deep as the waterline from when it was in the jar. Don’t worry about the small shoots—they’ll push through the soil when they’re ready!
Although water propagation is super easy, it can take longer than other methods, especially if your plant doesn’t get much indirect light.
But with a little patience, you’ll have a brand-new snake plant ready to thrive in its new home!
How to Propagate Snake Plants in Soil
If you’re looking for a faster way to propagate snake plants, rooting cuttings in soil is a great option.
This method lets you get multiple new plants from just one leaf!
What You’ll Need:
Sharp knife or scissors
Small pot
Succulent soil or well-draining potting mix
Rooting hormone (optional)
Step-by-Step Guide:
Take Your Cuttings – Start by choosing a healthy leaf and cutting it off as close to the soil line as possible with a sharp, sterilized knife or scissors.
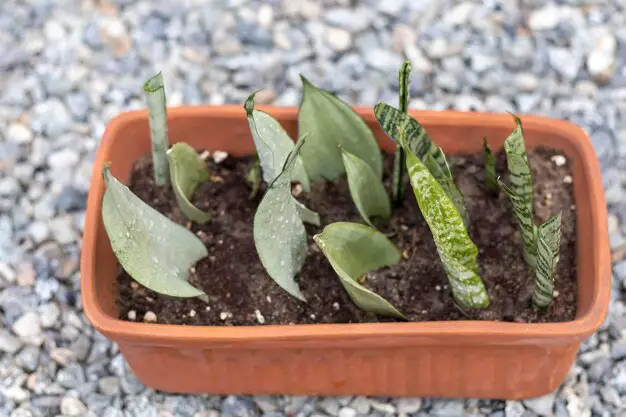
Divide the Leaf – Cut the leaf into several sections, each about 2–3 inches long. Each piece has the potential to grow into a new plant!
Let Them Dry – Lay the cuttings out in a dry, shaded spot for 2–3 days to allow the cut ends to callous over. This step is crucial because it helps prevent rot and bacterial infections once they’re in the soil—just like with succulents.
Remember the Orientation – Snake plant leaves have a top and bottom, and they won’t root if planted upside down. Be sure to keep track of which end was closest to the base of the original plant!
Dip in Rooting Hormone (Optional) – To speed up rooting, dip the bottom end of each cutting into rooting hormone powder before planting.
Plant in Soil – Use a well-draining potting mix, like succulent soil, and plant the cuttings upright with the bottom end buried about an inch deep. A small pot is fine for now since they don’t need much space to start.
Wait for Roots and New Growth – In about a month, your cuttings should start growing roots. A few weeks later, you’ll see small new shoots emerging from the base—this means your new snake plants are on their way!
Soil propagation is a bit faster than water propagation and is a great way to get multiple plants from one leaf. With a little patience, you’ll soon have plenty of new snake plants to add to your home or share with friends!
How to Propagate Snake Plants by Division
If you want more snake plants—fast, division is the way to go!
Instead of waiting for cuttings to root, this method lets you instantly create new plants by splitting up an existing one.
Another plant that is often propagated through plant division is the african violet.
However, snake plant division is very different to propagating african violets through division. So, if you are familiar with african violet division and want to propagate your snake plant in the same manner then you should still read this guide.
What You’ll Need:
Newspaper or an outdoor workspace
Clean, sharp knife or handsaw
Extra pots for your new plants
Succulent soil or well-draining potting mix
Step-by-Step Guide:
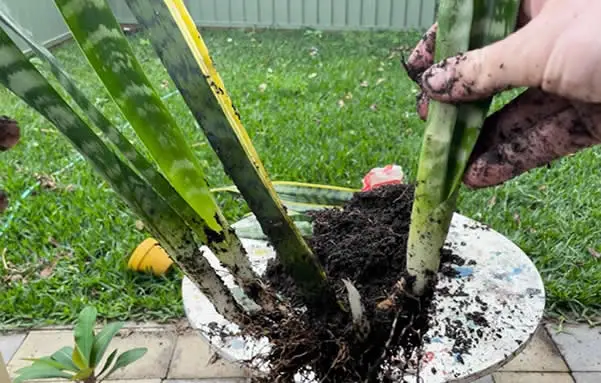
Remove the Plant from Its Pot – Lay down newspaper or work outside to contain the mess. Gently turn your snake plant on its side and slide it out of the pot. If it’s a bit stuck, give the container a few gentle taps.
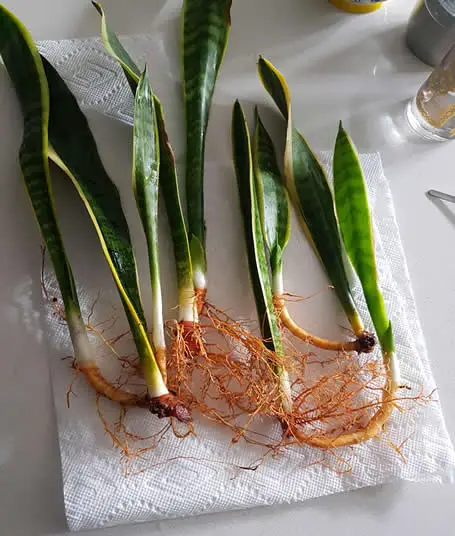
Check the Roots & Rhizomes – Look closely at the base of your plant. Snake plants grow from rhizomes—thick underground stems that store nutrients and produce new growth.
Decide How to Divide – If your plant is small, you might only be able to split it in half. Larger plants can be divided into multiple sections, as long as each one has at least three rhizomes and a healthy leaf.
Make Your Cuts – Using a sharp knife or handsaw, carefully cut through the root ball, ensuring each section has a few roots and at least one leaf. If a section doesn’t have roots, it’s not quite ready to be divided—give it more time to grow before attempting again.
Repot the New Plants – Place each divided section into its own fresh pot with succulent soil or another well-draining mix.
Water Lightly & Wait – Give each plant a small drink of water, then hold off on watering again until the soil has completely dried out. Overwatering at this stage can cause root rot.
That’s it! Division is the quickest way to grow your snake plant collection. Each section will continue growing as a separate, healthy plant, ready to thrive in your home!
Propagating Snake Plants Using Rhizomes
Did you know that snake plants grow from underground stems called rhizomes?
These horizontal stems store nutrients and produce new shoots, known as pups.
Even if your plant doesn’t have pups yet, you can still use rhizomes to grow brand-new snake plants!
What You’ll Need:
Newspaper or an outdoor workspace
Sharp knife or shears
New pots for each rhizome
Well-draining succulent soil or potting mix
Step-by-Step Guide:
Remove the Plant from Its Pot – Lay your snake plant on its side and gently slide it out of the container.
Locate the Rhizomes – Look near the roots for whitish, garlic-like stems. These underground structures store energy and help the plant spread.
Cut Off a Rhizome – Using a clean, sharp knife, carefully cut a rhizome away from the main plant. Be gentle to avoid damaging nearby roots.
Let It Callous Over – Just like with leaf cuttings, let the rhizome sit out for a few days so the cut end can dry and form a protective callous. This helps prevent rot when you plant it.
Plant the Rhizome – Once the cut end has calloused, place the rhizome into a fresh pot with well-draining succulent soil.
Be Patient – It may take some time, but new growth will emerge from the rhizome as it establishes itself.
That’s it! Growing snake plants from rhizomes is a simple, hands-off method to expand your collection. With a little time and care, you’ll have brand-new plants ready to thrive!
6 Conditions Essential For Successful Snake Plant Propagation
Not every snake plant cutting will take root, and even experienced gardeners sometimes lose cuttings for no clear reason.
However, you can boost your chances of success by providing the ideal conditions for your propagating plants.
Here’s what you need to know!
Bright, Indirect Light
While mature snake plants can handle low light conditions, cuttings need bright, indirect light to develop strong roots.
Without enough light, root growth can take months, while in good lighting, you’ll see results much faster.
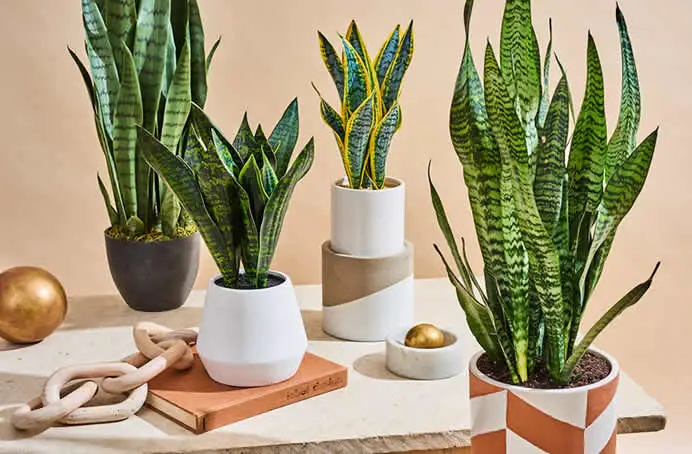
Choosing the Right Pot
Terracotta pots are ideal because they’re porous, allowing soil to dry out faster and reducing the risk of overwatering.
Always use a pot with a drainage hole—snake plants hate sitting in water.
Since tall snake plants can get top-heavy, a heavier pot will prevent tipping.
Keep Everything Clean
When you take cuttings, you create an open wound on the plant, making it vulnerable to bacteria and fungi.
To prevent infections:
Wash your pots and tools before propagating.
Consider sterilizing your knife or shears with rubbing alcohol for extra protection.
Use Well-Draining Soil
Snake plants hate soggy soil!
Using the right potting mix is crucial:
Succulent soil works best because it drains quickly and prevents root rot.
You can make your own mix by adding extra perlite to regular potting soil.
Some growers prefer soilless mixes made from perlite, vermiculite, coarse sand, and sphagnum peat moss.
Watering the Right Way
Overwatering is the biggest killer of snake plants!
Follow these golden rules:
Wait until the top 2–3 inches of soil is completely dry before watering.
When you do water, soak the soil thoroughly until water drains from the bottom.
Avoid watering again until the soil dries out completely—snake plants thrive on neglect!
Keep Temperatures Warm
Since snake plants are tropical, they prefer indoor temperatures between 60–80°F (16–27°C).
Avoid exposing them to cold conditions:
Below 50°F (10°C), snake plants may develop yellow or brown leaves.
Frost and freezing temperatures will kill them, so keep them away from drafty windows in winter.
How To Deal With No Growth On Propagated Plant
If your snake plant or its cuttings don’t seem to be growing, don’t panic!
Just because there’s no visible progress doesn’t mean your plant is dead.
Snake plants are naturally slow growers, and several factors can cause temporary dormancy.
Here’s what to check before you assume the worst.
Be Patient – It Might Just Be Dormant
Transplanting or propagating snake plants can cause them to pause their growth for weeks or even months.
If your plant isn’t yellowing, turning mushy, or completely drying out, just wait it out—it’s likely still alive!
Look for Hidden Root Growth
Even if you don’t see new leaves, your snake plant might be busy growing roots underground.
Some cuttings focus on establishing a strong root system before producing new leaves.
If it’s been several months, you can gently check for root development or simply give it more time.
Check for Signs of a Dead Plant
Your snake plant might actually be dead if:
The leaves are completely yellow and mushy.
The roots are soft and rotting when you check them.
There is no green left on the plant.
Can you save it?
If part of the plant is still green and firm, try cutting away the damaged parts and repotting in fresh, well-draining soil.
Consider the Growing Conditions
Snake plants thrive in specific conditions, and poor care can slow growth dramatically:
Lighting – Not enough indirect light? Growth will be much slower. Move your plant to a brighter spot.
Soil – If the soil doesn’t drain well, it could be retaining too much water and causing root rot. Switch to succulent soil or a mix with perlite for better drainage.
Watering – Too much water can cause rot, while too little can push the plant into dormancy. Only water when the top 2–3 inches of soil are completely dry.
Troubleshooting Snake Plant Propagation Problems
Even though snake plants are easy to propagate, things don’t always go as planned. That’s why it’s smart to take multiple cuttings—just in case some don’t make it.
If you run into issues, here’s what to look for and how to fix it.
Brown Leaf Edges or Tips
Cause: Usually, this happens when the room is too cold. Snake plants prefer temperatures above 60°F (16°C).
Fix: Move your cuttings to a warmer spot with bright, indirect light.
Less common cause:
Underwatering. If your snake plant looks withered, curled, or shriveled, it may be too dry.
Fix: Give it a thorough watering and adjust your routine to keep the soil slightly moist (but never soggy!).
Rotting & Root Rot
Rotting is one of the most common problems when propagating snake plants. It often starts as wet spots on the leaves that gradually spread.
In most cases, the rot begins at the roots, where it’s not visible at first.
Cause: Overwatering is the #1 reason for rot. If the soil stays too wet, the roots suffocate and decay.
Fix:
Remove the plant from the soil.
- Cut away any mushy, blackened roots or leaves with a clean, sharp knife.
- Let the plant dry out for a day or two before repotting in fresh, dry soil.
- Hold off on watering until the plant settles in—then only water when the soil is completely dry.
3. Pests & Disease
Even though snake plants are tough, they can still fall victim to pests and fungal diseases.
Common Pests:
Mealybugs – Look like small, white, cotton-like blobs. Can be removed by hand.
Spider mites – Tiny, red or brown insects that create fine webbing. Easily washed away with water.
Prevention: Keep your plant clean and dust-free to discourage pests.
Fungal Diseases:
Usually caused by high humidity or overwatering.
Can cause yellowing leaves, mushy spots, or leaf decay.
Fix:
- Keep leaves dry—don’t mist or splash water on them.
- Water only when the soil is dry.
- Provide good airflow around the plant.
Challenges with Leaf Cuttings from Variegated Snake Plants
Variegated snake plants are known for their striking appearance, with bold yellow vertical stripes on their leaves.
However, there’s a catch when it comes to propagating them from leaf cuttings: these plants tend to revert to an all-green variety over time.
If you’re aiming to maintain the beautiful variegation in your snake plant, it’s best to propagate by division instead of using leaf cuttings.
Dividing the original plant will give you a better chance of preserving the unique variegation in the new plants.
How Long Does It Take to Propagate a Snake Plant?
Snake plants are known for their slow-growing nature, so patience is key when propagating them. Typically, you’ll need to wait at least 6-8 weeks just to see root growth.
In some cases, especially if your cuttings are placed in a low-light environment, it could take even longer—up to 2-3 months before you see solid roots.
Once the roots begin to develop, it may take another 4-8 weeks for visible growth above the soil.
Don’t get discouraged if the process feels slow; snake plants need time to establish themselves, but with proper care, they’ll eventually thrive.
Why Propagate Snake Plants?
Propagating snake plants is a rewarding experience. It’s fascinating to watch as your cuttings develop roots and grow into healthy, young plants.
It can be a fun activity for the whole family—my kids love helping me propagate and care for our houseplants, and it’s always exciting to see those new shoots appear!
Another great reason to propagate snake plants is their low-maintenance nature.
These plants are perfect for beginners or anyone who may not have a lot of time to devote to plant care.
Once you’ve gotten them past the initial cutting stage, they’re quite hardy and can thrive with minimal attention.
Finally, propagating snake plants is a wonderful way to share the joy of plant ownership.
These resilient, beautiful plants make perfect gifts for friends and family, and everyone will appreciate having a low-maintenance, air-purifying plant in their homes.
So, go ahead and propagate—your snake plant collection is bound to flourish for years to come!