Brown Or Black Spots On Hibiscus Leaves. The Cause and Cure

Hibiscus plants are a great addition to any garden. The range of beautiful colorful blooms, on bell shaped buds, are stunning in both outdoor gardens and on indoor plants. Although these plants are easy to care for, like all plants they are prone to disease and damage.
One of the most most common concerns with hibiscus is when the leaves develop brown spots. Here we will look at the causes and the cures for brown spots on hibiscus leaves.
Table of Contents
4 Reasons Why Hibiscus Leaves Develop Brown Or Black Spots?
The most common cause for brown spots on hibiscus leaves is fertilizer burn.
This occurs due to over-fertilization of the plant.
Soil that is too too dry could also contribute to brown spots on hibiscus leaves.
The plant could also be entering a new leaf growing cycle where nutrients are shut-off from the old leaves.
A less common cause is hibiscus mites.

Let’s drill down a bit deeper into these causes.
Brown spots on hibiscus leaves have potential several causes, each of which has an easy fix.
Let’s take a look at the causes for brown spots on hibiscus leaves, from the most common first to least common last.
Then we will look at how to treat an affected plant.
Finally, I will show you how to avoid future recurrences of the problem.
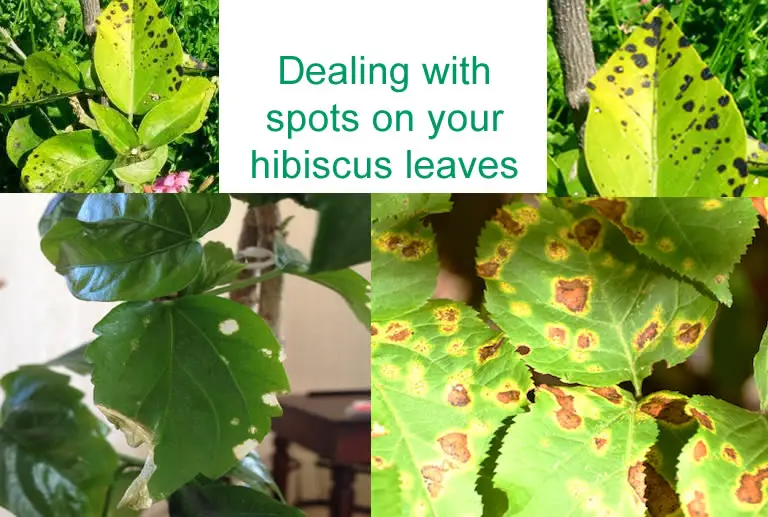
1. Over fertilization can lead to yellowing leaves with brown or black spots
The most common cause of brown spots on a hibiscus plant is fertilizer burn.
Fertilizer burn refers to the phenomenon of scorched, or burnt foliage on a plant.
This occurs when too much fertilizer is added to the soil around the plant or when fertilizer is applied directly to wet foliage.
Why does this happen when surely nutrients are good for healthy plant growth?
Well, almost all fertilizers contain salts. These salts are needed to make the fertilizer soluble and the salts also help add nutrients to the soil.
However, the salts can also draw out moisture from the plant.
So, when you apply excess fertilizer to plants, the salts in the fertilizer will cause too much moisture loss from the plant leaving it with insufficient amounts of water to reach the leaves.
Additionally, excess salt in the soil results in root damage which, in turn, results in a yellow or brown discoloration of the leaves and brown spots developing.
Unfortunately, over fertilization is a common problem with hibiscus plants because the plant actually requires regular fertilization – much more than many other common plants.
So, it is all too easy to get the timing wrong and over-fertilize the plant (and just as easy to under-fertilize it, though this only results in less blooms and less vibrancy of color in the flowers).
2. Improper watering can cause leaves to turn yellow & develop brown or black spots
Hibiscus are a fairly easy-to-care-for plant. Although tropical types need a warm climate to be successfully grown outdoors they are not a difficult plant or cultivate.
Likewise, hibiscus are easy to grow in containers indoors in any climate.
Hibiscus plants require very little container room and actually grow better when they are slightly root bound in a container.
Even when repotting a hibiscus plant, that has outgrown its container, only a little more space is needed in a new container to help the plant flourish.
Hibiscus requires daily watering for the plant to thrive in the warmer months and requires sufficiently damp soil throughout the colder months.
A lack of water can deprive a hibiscus plant of much needed hydration. This can result in a lack of proper nutrients reaching the leaves which causes the leaves to develop brown spots or to brown near the tips.
3. New leaf growth can cause black or brown spotting on old yellow leaves
When a hibiscus plant enters a new leaf growth cycle it will naturally start to deprive old leaves of nutrients.
As the old leaf becomes shut-off from nutrients it will start to show signs of decay.
With a hibiscus plant this sign of nutrient-deficiency manifests itself as brown spots that start at, or close to, the leaf tip and eventually work their way inwards.
This is a perfectly natural plant cycle and is nothing to worry about.
New leaf growth will usually occur in late winter or early spring and there will be indications on the plant that new leaves are starting to grow.
4. Pests can cause brown spots to appear on Hibiscus leaves
Brown leaves on a hibiscus plant can sometimes be caused by pests, most notably the hibiscus mite.
Although this is a much less common cause and is, in fact, rare, it is worth mentioning just in case you are one of the very unfortunate people who experience this problem.
Pests can burrow into the hibiscus leaf and cause damage from within the leaf itself making the mites difficult to see.
Luckily, this particular cause is very easy to identify from the condition of the leaves.

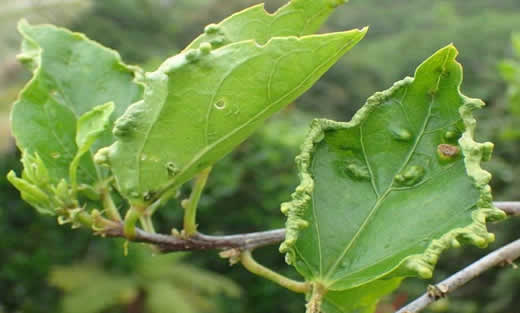
Indications of brown spots on a hibiscus plant due to pest damage will be evidenced by deformed leaves that are curled at the edges as shown in the image above.
Be aware that many times the spots on the leaves of a hibiscus plant, that is being attacked by hibiscus mites, will be black rather than brown . It could also have a mixture of brown and black spots.
4 Ways To Deal With Brown Or Black Spots And Yellow Leaves On Hibiscus Plants
The best way to deal with brown spots on hibiscus plant leaves is to prevent it happening in the first place.
Follow the advice given below under the section proper hibiscus care.
However, when you already have the problem you will need to take steps to reify it.
To deal with leaves that have already developed brown spots follow the advice given below.
Why brown and black spots often accompany yellow leaves
As I mention later, over-fertilization, and/or applying fertilizer directly to wet hibiscus leaves, can cause a yellowing of the leaves.
If your hibiscus plant has both yellow leaves and brown spots then it is almost certainly being caused by fertilizer burn.
Take the steps mentioned in this article to treat your plant. And be sure to protect it from future damage by following the feeding schedule outlined in the care guide above.
An incorrect watering routine can also be to blame for a yellowing of the leaves as this can be a sign of dehydration, which is not always due to underwatering! (see my article on root rot).
In many instances yellowing leaves on your Hibiscus plant are not at all anything to be concerned about.
Old leaves that are dying and making way for new leaf growth will often turn yellow before they fall away from the plant.
1. Stop over fertilizing the plant
If, after reading the information above, you have identified that the cause of the brown spots on your hibiscus leaves are due to over-fertilization don’t panic.
There is a cure.
You will need to flush the soil by watering the plant heavily.
First, remove as much of the fertilizer, that is visible on top of the soil, as you can. Simply scoop it up and dispose of it.
If there is any evidence of fertilizer on the leaves gently wipe it off with a wet cloth.
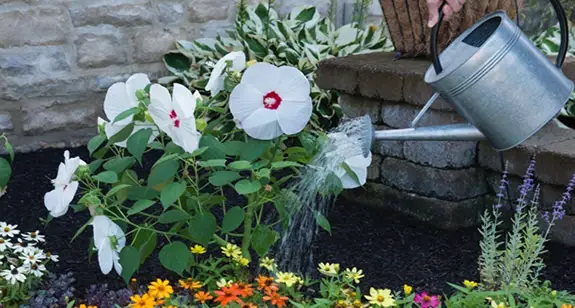
Then, over the next few days, wash away the remaining fertilizer from the soil by heavily watering the plant each day.
Hibiscus require daily watering anyway so don’t worry about drowning the roots of the plant. As long as their is adequate drainage the plant will be fine.
Obviously, flushing the soil clear of fertilizer will be easier with hibiscus plants that are in containers (that have adequate drainage holes). This is because the soil is localized, but garden hibiscus will respond well to this approach as well.
With ground planted hibiscus the water will seep further down into the soil as long as the soil is not compacted.
With ground planted hibiscus you obviously don’t want the water to gather up around the plant. Nor do you want it to run off into other areas of your garden, so water the plant slowly allowing the water to seep down into the soil.
2. Get your watering routine right!
If the brown spots on your hibiscus plant have been caused by lack of water and nutrients then your plant is dehydrated and you should thoroughly soak it.
If it is in a container simply submerge it in water.
Bubbles will rise to the water surface as the water seeps into the soil forcing pockets of air in the soil to be pushed out.
Leave the plant submerged until all the bubbles disappear, but no longer than this.
This should take only a minute or two.
You will have given your plant the equivalent of a good cool drink of water.
If you cannot submerge your plant in water then simply water it heavily making sure you do so slowly and steadily.
Be sure to continue a daily normal watering routine after this, watering it according to its seasonal needs as outlined below in the care guide.
3. Be aware of potential new leaf growth
If you see brown spots on your hibiscus plant that are due to new leaf growth you need do nothing.
Of course you always have the option of removing the unsightly leaves from your plant but this is entirely unnecessary.
If you do choose to remove the affected leaves be absolutely sure that new leaf growth is the cause and it is not due to one of the other causes listed above.
New leaf growth will usually occur in late winter or early spring and you will be able to visually check that new leaf buds are developing.
4. Take action to avoid pest damage
Using a good quality hibiscus-friendly pesticide spray, (which will not affect the growth of your plant), is the best way to deal with a pest infestation.
I recommend using a natural organic pesticide for the care of your plant, to prevent pest infestations in the first place.
However, sometimes organic solutions are simply not strong enough to rid your plant of a particularly bad infestation.
What I normally do is treat the plant with a strong natural organic pesticide first to see if this will cure the problem. Organic pesticides are not only better for your plant but they are better for the environment as a whole.
Only if the organic approach fails will I resort to chemical solutions.
You can create a homemade natural solution by mixing normal mild liquid dish soap with water.
Simply mix 3 tablespoons of the soap with a gallon of water and add to a spray bottle.
Only spray the leaves!
Do not spray the soil.
When using a homemade solution you may also want to gently wipe the leaves as they will help remove mite eggs.
If the plant starts to respond quickly to the organic approach, it will show signs of mite decay (i.e. no signs of new infections).
If this isn’t clear after a day or two then I will switch to a stronger chemical product like the one linked to above.
Don’t over do the chemical pesticide with multiple applications. Give the stuff time to work.
Continually spraying your plant with pesticide will cause excess amounts to drip down into the soil which is something you do not want to happen.
Basic Hibiscus Care Guide
Below are some tips for avoiding brown spots and yellow leaves developing on your hibiscus plant in the first place or from recurring in the future.
Hibiscus fertilization guide
Many times new gardeners, or people new to home plant care, will make the mistake of assuming that adding more fertilizer to their plants will help them flourish and grow better.
Unfortunately, the exact opposite thing happens.
Adding too much fertilizer to a plant causes fertilizer burn, as we covered above.
Hibiscus plants are slightly different from other plants though, in that they need constant fertilization.
The abundant flowers with their array of bright colors require a lot of nutrients to maintain that type of growth.
As do the stems, which need to be hardy to support the heavy flowers.
This means they need to be feed frequently which can lead to inexperienced gardeners over-fertilizing their plants or under-fertilizing them.
Hibiscus plants require much more feeding, than most of the more common house plants and garden plants, if you want them to bloom often and well.
A good common fertilizer, like miracle-grow, works well enough to feed hibiscus (though there is something better as outlined below).
If using a fertilizer like miracle grow use the routine below:
- Mix 1/3 cap of fertilizer with 2 gallons of water for hibiscus that are planted directly in the ground.
- For indoor hibiscus in containers, mix 1 teaspoon of fertilizer with 1 gallon of water.
- Apply every 14 – 21 days.
Hibiscus require the most feeding during the growing season when the plants are producing all that foliage and flowers.
You should feed your plant, at the very least, once per month (depending on the fertilizer you are using).
Light feeding done often is preferable over heavy feeding done infrequently.

Heavy feeding leads to fertilizer burn, and an unhealthy plant, while regular light feeding will keep your plant healthy and blooming in vibrant colors for years.
A specially formulated feed for hibiscus, like HibicusGain, has the exact mixture of nutrients needed for the plant and requires only monthly applications. It is formulated especially for hibiscus plants.
Following the accompanying feeding instructions will ensure you avoid fertilizer burn and the brown spots and yellow leaves that accompany it.
As an added note it is good to be aware that hibiscus plants devour potassium and grow best in potassium-rich soil and grow better being feed by potassium-rich fertilizer.
Correct Hibiscus watering routine
Hibiscus require regular watering in warm weather.
Tropical hibiscus thrive in the warmth but all that heat robs them of water quickly.
Be sure to water your hibiscus plant daily, especially if it is outdoors in hot weather.
If it is an indoor plant then be sure you use a container with adequate drainage holes and also water it daily in the warmer months.
In cooler months you can reduce the watering schedule significantly. Instead of a daily watering routine, water your hibiscus when the top layer of soil becomes dry.
Do not let the soil dry out completely, as you would with succulents like aloe.
When the top layer of soil is dry there will still be enough moisture in the lower layers to hydrate the plant in the cooler months. But, it is at this stage that you need to re-water to ensure the soil remains damp.
Pest control for a healthy Hibiscus
I will spray my plants with an organic pesticide once per year, usually around the time that pests tend to surface.
Although this is not completely necessary I find that taking the time to do this protects my plants from pest infestations.
Does it stop pests getting onto my plants?
Not always.
But, it does prevent a lot of potential infections from taking place and even when pests do take “root” (excuse the pun) the protection I offered them certainly slows down the infection rate and makes dealing with them much easier.
Thanks for reading! I'm Michael — houseplant fanatic and your Pinterest plant guide.
Follow me on Pinterest for fresh updates 🌿


